


Flutter, Hive And Getx
LEARN HOW TO USE HIVE AND GETX IN FLUTTER BY BUILDING ET SIMPLE NOTES APP


LEARN HOW TO USE HIVE AND GETX IN FLUTTER BY BUILDING ET SIMPLE NOTES APP
Introduction
Hi everybody, i'm Jocelin and we are going to work with Flutter, especially how to use GetX and Hive.
Defintions
Flutter is an open-source UI software development kit created by Google. It is used to develop cross platform applications for Android, iOS, Linux, Mac, Windows, Google Fuchsia, and the web from a single codebase.
GetX is an extra-light and powerful solution for Flutter. It combines high-performance state management, intelligent dependency injection, and route management quickly and practically. visit this link for more informations.
Hive is a lightweight and blazing fast key-value database written in pure Dart. visit this link for more informations.
After these brief definitions of the main terms, I think we can get started in pratice.
Get ready, let's go !!!
Create project
let's use Android Studio to create a new flutter project. We will get this basic structure.
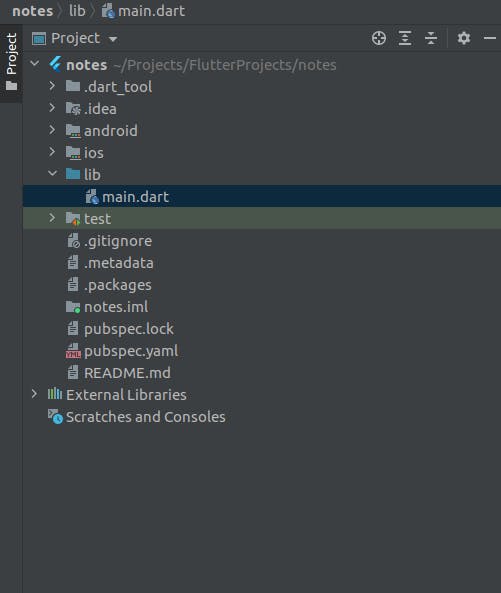
As you can see, I called the app notes, you can call it whatever you want.
Install depencies
Now we are going to install all the dependencies we will use in this project. here i made a screenshot of the pubspec.yaml file.
 we installed, get for getx and hive of course. We also installed path_provider, which is a flutter plugin for finding commonly used locations on the filesystem.
Project Structure
All the dependencies being installed, we have to structure the project. Here are all the files and folders i created.

We have:
widgets folder : containing two files. Input.dart and NoteView.dart which are constant widgets we will use in the project.
utils folder : containing Colors.dart. this file will contain all the colors of our application.
screens folder : containing AddNoteScreen.dart, EditNoteScreen.dart, NoteListScreen.dart and ViewNoteScreen.dart which are all screens needed in this app.
Models folder : containing Note.dart the model, and Note.g.dart the model's adapter; so that the model will be recognized by hive.
hive folder : containing NoteBox.dart file. We will use this file to manage our hive database.
And finally;
controllers folder : containing NoteController.dart file, used to set Getx variables and methods.
Code
Let's start coding our app!
Open the main.dart file and modify our main() function. Paste the code below
import 'dart:io';

import 'package:flutter/material.dart';
import 'package:get/get.dart';
import 'package:hive/hive.dart';
import 'package:notes/Models/Note.dart';
import 'package:notes/sceens/NotesListScreen.dart';
import 'package:path_provider/path_provider.dart';

void main() async{
  WidgetsFlutterBinding.ensureInitialized();
  Directory document = await getApplicationDocumentsDirectory();
  Hive..init(document.path)..registerAdapter(NoteAdapter());
  await Hive.openBox("noteBox");
  runApp(MyApp());
}

class MyApp extends StatelessWidget {
  @override
  Widget build(BuildContext context) {
    return GetMaterialApp(
      title: 'Notes',
      home: NotesListScreen(),
    );
  }
}
Let's explain what we are seing here.
WidgetsFlutterBinding.ensureInitialized(); : The WidgetFlutterBinding is used to interact with the Flutter engine. Hive.init() needs to call native code to initialize Hive, and since the plugin needs to use platform channels to call the native code, which is done asynchronously therefore you have to call ensureInitialized() to make sure that you have an instance of the WidgetBinding.
Directory document = await getApllicationDoucmentsDirectory(); : Give us path to a directory where application may place data that is user-generated, or that cannot otherwise be created by your application.
Hive.init(document.path); : We initialize Hive in the path created before;
Hive.registerAdapter(NoteAdapter()); : We register our NoteAdapter, so that Hive could recognize our Note model. We will work on it after.
await Hive.openBox("noteBox"); : We create our database "noteBox";
And finally instead of returning a MaterialApp , we return a GetMaterialApp . So that our app will be in a getx context.
We go with the Colors.dart file. Open the file a paste the code below.
import 'package:flutter/material.dart';

const pink = Color(0xFFC42251);
const black = Color(0xFF222222);
const white = Color(0xFFFFFFFF);
These are all the colors that our app will use.
we continue with our widgets. In Input.dart, past this code:
import 'package:flutter/material.dart';
import 'package:notes/utils/Colors.dart';

class Input extends StatefulWidget {

  final String labelText;
  final Icon icon;
  final TextEditingController textEditingController;

  const Input({Key? key, required this.labelText, required this.icon, required this.textEditingController}) : super(key: key);

  @override
  _InputState createState() => _InputState();
}

class _InputState extends State<Input> {
  @override
  Widget build(BuildContext context) {
    return Container(
      width: MediaQuery.of(context).size.width * 0.75,
      child: TextFormField(
        cursorColor: pink,
        controller: widget.textEditingController,
        keyboardType:  TextInputType.emailAddress,
        style: TextStyle(
          color: black,
        ),
        decoration: InputDecoration(
          labelText: widget.labelText,
          labelStyle: TextStyle(
            color: black,
          ),
          icon: widget.icon,
          focusedBorder: UnderlineInputBorder(
            borderSide: BorderSide(
              color: pink,
            ),
          ),
        ),
      ),
    );
  }
}
our Input widget has three params, a label text, an icon and a text controller.
Now open the NoteView.dart file, and paste the code below:
import 'package:flutter/material.dart';
import 'package:get/get.dart';
import 'package:notes/Models/Note.dart';
import 'package:notes/sceens/EditNoteScreen.dart';
import 'package:notes/sceens/ViewNoteScreen.dart';
import 'package:notes/utils/Colors.dart';


class NoteView extends StatefulWidget {
  final Note note;
  const NoteView({Key? key, required this.note}) : super(key: key);

  @override
  _NoteViewState createState() => _NoteViewState();
}

class _NoteViewState extends State<NoteView> {

  delete(){}

  edit(){
    Get.to(() => EditNoteScreen(note: widget.note));
  }

  @override
  Widget build(BuildContext context) {
    return ListTile(
      title: Text(widget.note.title, overflow: TextOverflow.ellipsis,),
      subtitle: Text(widget.note.description, overflow: TextOverflow.ellipsis,),
      onTap: (){
        Get.to(() => ViewNoteScreen(note: widget.note));
      },
      trailing: Container(
        width: 100,
        child: Row(
          children: [
            IconButton(onPressed: edit, icon: Icon(Icons.edit)),
            IconButton(onPressed: delete, icon: Icon(Icons.delete)),
          ],
        ),
      ),
    );
  }
}
This widget take a Note object as parameter. It has two methods: the edit() method used to navigate to the EditScreen while passing the Note object as parameter; and the delete() in which we will work later.
In NoteController we have :
import 'package:get/get.dart';

class NoteController extends GetxController{

  List _notes = [];

  List get notes => _notes;

  setNotes(List data){
    _notes = data;
    update();
  }

}
update() will update all the varaibles in this class wherever their are used.
Let's dive in the NoteBox.dart and paste the code below:
import 'package:get/get.dart';
import 'package:hive/hive.dart';
import 'package:notes/controllers/NoteController.dart';

class NoteBox{

  getNotes(){
    return Hive.box("noteBox").get("notes", defaultValue: []);
  }

  putNotes(List data) async {
    final NoteController noteController = Get.find();
    await Hive.box("noteBox").put("notes", data);
    List notes = getNotes();
    noteController.setNotes(notes);
  }

}
we have two methods manage our hive database:
getNotes() method : This method return all the notes stored in our database; putNotes() method : This method take a List as parameters and set it in our database with "notes" as key. After that, we call setNotes() of our NoteController which take notes return by our getNotes() as parameters.
let's create our Note model. Paste this code in Note.dart
import 'package:get/get.dart';
import 'package:hive/hive.dart';
import 'package:notes/controllers/NoteController.dart';
import 'package:notes/hive/NoteBox.dart';
import 'package:notes/sceens/ViewNoteScreen.dart';

part 'Note.g.dart';

@HiveType(typeId: 0)
class Note extends HiveObject{

  @HiveField(0)
  int id;

  @HiveField(1)
  String title;

  @HiveField(2)
  String description;

  Note({required this.id, required this.title, required this.description});

  add(){
    final NoteController noteController = Get.find();
    List notes = noteController.notes;
    notes.add(this);
    NoteBox().putNotes(notes);
    Get.off(() => ViewNoteScreen(note: this));
    Get.snackbar("Add", "Success", snackPosition: SnackPosition.BOTTOM);
  }

  delete() async {
    final NoteController noteController = Get.put(NoteController());
    List notes = noteController.notes;
    notes.remove(this);
    NoteBox().putNotes(notes);
    Get.snackbar("Delete", "Success", snackPosition: SnackPosition.BOTTOM);
  }

  edit(String title, String description){
    this.title = title;
    this.description = description;
    final NoteController noteController = Get.put(NoteController());
    List notes = noteController.notes;
    notes[this.id] = this;
    NoteBox().putNotes(notes);
    Get.off(() => ViewNoteScreen(note: this));
    Get.snackbar("Edit", "Success", snackPosition: SnackPosition.BOTTOM);
  }

}
And the NoteAdapter in Note.g.dart
part of "Note.dart";

class NoteAdapter extends TypeAdapter<Note> {
  @override
  final typeId = 0;

  @override
  Note read(BinaryReader reader) {
    var numOfFields = reader.readByte();
    var fields = <int, dynamic>{
      for (var i = 0; i < numOfFields; i++) reader.readByte(): reader.read(),
    };
    return Note(
      id: fields[0] as int,
      title: fields[1] as String,
      description: fields[1] as String
    );
  }

  @override
  void write(BinaryWriter writer, Note obj) {
    writer
      ..writeByte(3)
      ..writeByte(0)
      ..write(obj.id)
      ..writeByte(1)
      ..write(obj.title)
      ..writeByte(2)
      ..write(obj.description);
  }
}
We can now go and complete our delete() function in NoteView widget.
delete(){
      Get.defaultDialog(
        title: "Delete this Note ?",
        middleText: "",
        textConfirm: "Delete",
        textCancel: "Cancel",
        cancelTextColor: pink,
        confirmTextColor: black,
        onConfirm: (){
          widget.note.delete();
          Get.back();
        },
      );
  }
The NoteView.dart now look like this:
import 'package:flutter/material.dart';
import 'package:get/get.dart';
import 'package:notes/Models/Note.dart';
import 'package:notes/sceens/EditNoteScreen.dart';
import 'package:notes/sceens/ViewNoteScreen.dart';
import 'package:notes/utils/Colors.dart';


class NoteView extends StatefulWidget {
  final Note note;
  const NoteView({Key? key, required this.note}) : super(key: key);

  @override
  _NoteViewState createState() => _NoteViewState();
}

class _NoteViewState extends State<NoteView> {

  delete(){
      Get.defaultDialog(
        title: "Delete this Note ?",
        middleText: "",
        textConfirm: "Delete",
        textCancel: "Cancel",
        cancelTextColor: pink,
        confirmTextColor: black,
        onConfirm: (){
          widget.note.delete();
          Get.back();
        },
      );
  }

  edit(){
    Get.to(() => EditNoteScreen(note: widget.note));
  }

  @override
  Widget build(BuildContext context) {
    return ListTile(
      title: Text(widget.note.title, overflow: TextOverflow.ellipsis,),
      subtitle: Text(widget.note.description, overflow: TextOverflow.ellipsis,),
      onTap: (){
        Get.to(() => ViewNoteScreen(note: widget.note));
      },
      trailing: Container(
        width: 100,
        child: Row(
          children: [
            IconButton(onPressed: edit, icon: Icon(Icons.edit)),
            IconButton(onPressed: delete, icon: Icon(Icons.delete)),
          ],
        ),
      ),
    );
  }
}
To end with this tutorial, let's create our screens
AddNoteSreen.dart
import 'package:flutter/material.dart';
import 'package:get/get.dart';
import 'package:notes/Models/Note.dart';
import 'package:notes/controllers/NoteController.dart';
import 'package:notes/utils/Colors.dart';
import 'package:notes/widgets/Input.dart';

class AddNoteScreen extends StatefulWidget {
  const AddNoteScreen({Key? key}) : super(key: key);

  @override
  _AddNoteScreenState createState() => _AddNoteScreenState();
}

class _AddNoteScreenState extends State<AddNoteScreen> {

  final NoteController noteController = Get.put(NoteController());

  TextEditingController titleController = TextEditingController();
  TextEditingController descriptionController = TextEditingController();

  add(){
    Note note = Note(
      id: noteController.notes.length,
      title: titleController.text,
      description: descriptionController.text
    );
    note.add();
  }

  @override
  Widget build(BuildContext context) {
    return Scaffold(
      appBar: AppBar(
        backgroundColor: pink,
      ),
      body: ListView(
        children: [
          Input(
              labelText: "Title",
              icon: Icon(Icons.title, color: pink),
              textEditingController: titleController
          ),
          Input(
              labelText: "Description",
              icon: Icon(Icons.notes, color: pink),
              textEditingController: descriptionController
          ),
          SizedBox(height: 20.0,),
          TextButton(
            onPressed: (){
              add();
            },
            child: Text(
              "Add",
              style: TextStyle(
                  fontSize: 14
              ),
            ),
            style: ButtonStyle(
              padding: MaterialStateProperty.all<EdgeInsets>(EdgeInsets.all(15.0)),
              foregroundColor: MaterialStateProperty.all<Color>(white),
              backgroundColor: MaterialStateProperty.all<Color>(pink),
              shape: MaterialStateProperty.all<RoundedRectangleBorder>(
                  RoundedRectangleBorder(
                      borderRadius: BorderRadius.circular(15.0),
                      side: BorderSide(color: pink)
                  )
              ),
            ),
          )
        ],
      ),
    );
  }
}
EditNoteScreen.dart
import 'package:flutter/material.dart';
import 'package:notes/Models/Note.dart';
import 'package:notes/utils/Colors.dart';
import 'package:notes/widgets/Input.dart';

class EditNoteScreen extends StatefulWidget {

  final Note note;

  const EditNoteScreen({Key? key, required this.note}) : super(key: key);

  @override
  _EditNoteScreenState createState() => _EditNoteScreenState();
}

class _EditNoteScreenState extends State<EditNoteScreen> {

  TextEditingController titleController = TextEditingController();
  TextEditingController descriptionController = TextEditingController();

  @override
  void initState() {
    titleController.text = widget.note.title;
    descriptionController.text = widget.note.description;
    super.initState();
  }

  edit(){
    widget.note.edit(titleController.text, descriptionController.text);
  }

  @override
  Widget build(BuildContext context) {
    return Scaffold(
      appBar: AppBar(
        backgroundColor: pink,
      ),
      body: ListView(
        children: [
          Input(
            labelText: "Title",
            icon: Icon(Icons.title, color: pink),
            textEditingController: titleController
          ),
          Input(
              labelText: "Description",
              icon: Icon(Icons.notes, color: pink),
              textEditingController: descriptionController
          ),
          TextButton(
            onPressed: (){
              edit();
            },
            child: Text(
              "Edit",
              style: TextStyle(
                fontSize: 14
              ),
            ),
            style: ButtonStyle(
              padding: MaterialStateProperty.all<EdgeInsets>(EdgeInsets.all(15.0)),
              foregroundColor: MaterialStateProperty.all<Color>(white),
              backgroundColor: MaterialStateProperty.all<Color>(pink),
              shape: MaterialStateProperty.all<RoundedRectangleBorder>(
                RoundedRectangleBorder(
                  borderRadius: BorderRadius.circular(15.0),
                  side: BorderSide(color: pink)
                )
              ),
            ),
          )
        ],
      ),
    );
  }
}
Because i just want to show you how to use Hive and GetX, I didn't check the values enter by the user
ViewNoteScreen.dart
import 'package:flutter/material.dart';
import 'package:notes/Models/Note.dart';
import 'package:notes/utils/Colors.dart';

class ViewNoteScreen extends StatefulWidget {
  final Note note;
  const ViewNoteScreen({Key? key, required this.note}) : super(key: key);

  @override
  _ViewNoteScreenState createState() => _ViewNoteScreenState();
}

class _ViewNoteScreenState extends State<ViewNoteScreen> {
  @override
  Widget build(BuildContext context) {
    return Scaffold(
      appBar: AppBar(
        backgroundColor: pink,
      ),
      body: ListView(
        children: [
          SizedBox(height: 15.0),
          Text(widget.note.title),
          SizedBox(height: 15.0),
          Divider(),
          SizedBox(height: 15.0),
          Text(widget.note.description)
        ],
      ),
    );
  }
}
And NotesListScreen.dart
import 'package:flutter/material.dart';
import 'package:get/get.dart';
import 'package:notes/controllers/NoteController.dart';
import 'package:notes/hive/NoteBox.dart';
import 'package:notes/sceens/AddNoteScreen.dart';
import 'package:notes/utils/Colors.dart';
import 'package:notes/widgets/NoteView.dart';

class NotesListScreen extends StatefulWidget {
  const NotesListScreen({Key? key}) : super(key: key);

  @override
  _NotesListScreenState createState() => _NotesListScreenState();
}

class _NotesListScreenState extends State<NotesListScreen> {

  getNotes() async {
    final NoteController noteControllerP = Get.put(NoteController());
    await noteControllerP.setNotes(NoteBox().getNotes());
  }

  @override
  void initState() {
    getNotes();
    super.initState();
  }

  @override
  Widget build(BuildContext context) {
    return Scaffold(
      appBar: AppBar(
        backgroundColor: pink,
        title: Text("Notes"),
        centerTitle: true,
      ),
      body: GetBuilder(
        builder: (NoteController noteController){
          return noteController.notes.length == 0 ? Center(
            child: Text("No data found !"),
          ): ListView.builder(
              itemCount: noteController.notes.length,
              itemBuilder: (context, index){
                return NoteView(note: noteController.notes[index]);
              }
          );
        },
      ),
      floatingActionButton: FloatingActionButton(
        onPressed: () {
          Get.to(() => AddNoteScreen());
        },
        child: Icon(Icons.add, color: white),
        backgroundColor: pink,
      ),
    );
  }
}
We are done ! You can now run your app and enjoy.
Hope that this will help you!
You can find the project repo here
Just to clarify, this is my first tutorial, so i am open to all your comments
Thank you !!!